Adding Authentication to Remote MCP Servers Using a Lightweight Proxy
リモート MCP サーバーの認証を軽量プロキシで行う方法
English follows Japanese.
概要
認証機能を持たない MCP サーバーに対して、軽量な OAuth2 の Proxy を使って認証機能を追加することが可能です。例えば、クラウド上に立ち上げた MCP サーバーを、安全に保護することができます。/.well-known/oauth-protected-resource の部分で工夫が必要です。OAuth2 Proxy は機能豊富ですが一部機能の不足で目的を達成できませんでした。
はじめに
本記事では、「MCP クライアント -> MCP サーバー -> 操作先サービス」の関係において、MCP クライアントを操作しているユーザーの認証について議論しています。
特に、「MCP クライアント -> MCP サーバー」の部分において、MCP サーバーにアクセスするユーザーの認証を行う方法として、自作の軽量な OAuth2 の Proxy を使う方法を紹介します。
背景・状況の整理
背景・状況の整理のまとめ
「ユーザー権限型」と「共用型」(後述)の MCP サーバーにおいて、「ユーザー権限型」は認証機能を有しています。「共用型」に認証機能を追加したいものです。
背景・状況の整理の詳細(ユーザー権限型と共用型の区別)
LLM が組み込まれたエージェント等に「あるサービス/ソフトウェアに関する作業」を依頼する場合、MCP サーバーが便利です。ユーザー(利用者)が開発者(IT エンジニア)であり、かつ、ローカルにコマンド実行環境やコンテナ環境を持っている場合、ローカルで MCP サーバーを立ち上げて、作業をさせることができます。
一方で、非 IT エンジニアの利用者が MCP サーバーを使う場合も考えると、チーム内の開発者が MCP サーバーを立ち上げたり、会社で誰かが代表して MCP サーバーを立ち上げたりしておくと有用です。多数のユーザーが個々の環境で MCP サーバーを立ち上げるのではなく、リモートの MCP サーバーを立ち上げておき、利用者はそこにアクセスして作業を依頼する形です。個々の環境で MCP サーバーを立ち上げるのは不便ですね。
ただし、リモートの(インターネットに公開するような)MCP サーバーを立ち上げる場合、アクセス制御を行う必要があります。つまり、認証・認可の問題が発生します。全世界の誰からもアクセスできるようにしてしまうと、悪意のある利用者が MCP サーバーを使って不正な作業を行う可能性があります。そこで、リモートの MCP サーバーにアクセスする際には、ユーザーの認証情報を確認する必要があります(限定的な状況では、IP 制限を使うことも可能ですね)。
MCP サーバーには、いくつかの動作や認証の種類があると思いますが、ここでは、一旦以下の2種類に分類し、今回は「共用型」に認証を入れる話に焦点を当てて説明します。
分類:
- ユーザー権限型: ユーザーの権限で操作を行う
- 共用型: (アクセス先には API キー等で認証し)共通の権限で操作を行う
「ユーザー権限型」の MCP サーバーは、「MCP クライアント -> MCP サーバー -> 操作先サービス」の関係において、操作先サービスあるいは第三者が、クライアントに指示しているユーザーを認証し、操作先サービスに対して「その認証されたユーザーの権限で(ユーザーに成り代わって)操作を行う」ものです。つまり、MCP サーバーは、利用者の認証情報を伴って操作先サービスにアクセスする必要があります。
このような「ユーザー権限型」の MCP サーバーは、MCP サーバー、あるいは、操作先サービスが OAuth2 (等)の認証をサポートしています。認証・認可の機能は予め搭載されているため、特別なことを行う必要がありません。
ところが、「共用型」の MCP サーバーは、操作先サービスに対して共通の権限でアクセスするため、利用者の認証情報を使う必要がありません。逆に、「その MCP サーバーを利用して良いのが誰か」を認可する仕組みは、通常搭載されていません。利用者共通のパスワード(API キーと言っても良いでしょう)を使うこともできますが、共通にしてしまうと、誰がその MCP サーバーを使ったのかを追跡することができませんし、秘匿情報のローテーション等の運用も難しくなります。そこで、リモートの MCP サーバーにアクセスする際に、ユーザーの認証・認可の機能を追加したくなります。
「共用型」としては、例えば、操作先サービスに対する API キーの発行を受けて、それを Secret 経由で登録しておくタイプの MCP サーバーを想定しています。確かに、ここに「API キー」は存在してしまっています。しかし、「社内にいる多数の利用者」に「共通のパスワード(API キー)」を渡す…のは、ちょっと違うだろう…ということを言っています。
「MCP サーバー -> 操作先サービス」の部分は利用者から見えません。API キーを秘匿情報 (Secret) として安全に保持する仕組みは確立されています。問題は、「MCP クライアント -> MCP サーバー」の部分です。ここに、ユーザー共通のパスワードではなく、「誰」がアクセスしていて、「その人がアクセスして良いのか」を認可する仕組みを追加したい、ということです。
自作の軽量 OAuth2 Proxy
良く知られている “OAuth2 Proxy" とは異なります。本ソフトウェアを新規で開発した理由は後で述べますが、OAuth2 Proxy では目的達成できなかったためです。
設定例・設定の流れ
OAuth2
まずは、Client ID と Client Secret を取得します。この、自作の OAuth2 Proxy では、OAuth2 プロバイダーに登録したアプリケーションの Client ID と Client Secret を使って、ユーザーの認証を行います。
私は、Google Cloud プロジェクトを用意し、Google Cloud (Google) の OAuth2 認証を使うことにしました。Google Cloud プロジェクトの作成、OAuth2 クライアント ID の作成、リダイレクト URI の設定等が必要です。
設定をしたことが一度もない方にとっては難しい部分があるかもしれませんが、この記事の本題からは外れるので、ここでは必要な部分の説明にとどめ、詳細な手順は省略します。
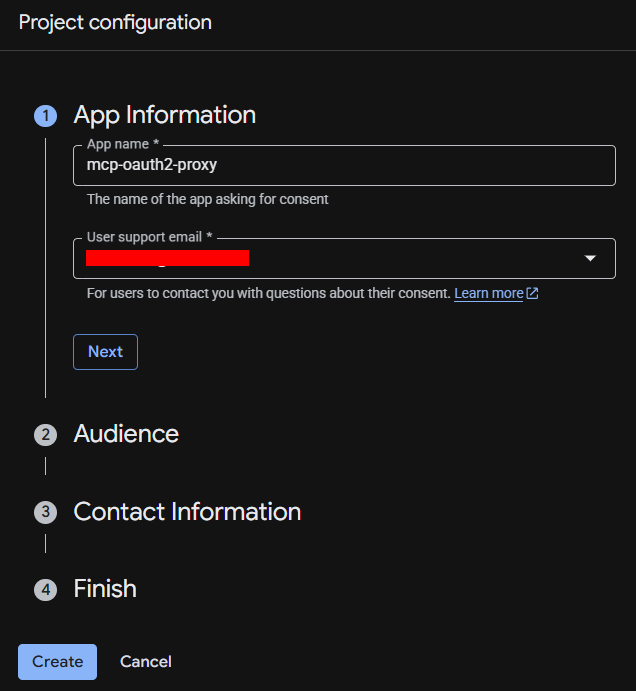

Client ID と Client Secret をメモしておいてください。
Authorized redirect URIs に https://antigravity.google/oauth-callback` とhttp://localhost:8080/oauth2/callback` を追加しておいてください。
Docker Compose 形式の設定例
取得したら、設定ファイルに記述します。設定を環境変数で受け取るように構成していますので、Docker Compose の設定ファイルに YAML 形式で記述することとしました。以下は、Google OAuth2 認証を使う場合の設定例です。
GitHub のリポジトリに同じファイルを置いています docker-compose.yaml ので、そちらも参考にしてください。OAUTH2_PROXY_CLIENT_ID, OAUTH2_PROXY_CLIENT_SECRET, OAUTH2_PROXY_ALLOWED_EMAILS の部分は、OAuth2 プロバイダーに登録したアプリケーションの Client ID と Client Secret、認証を許可するユーザーのメールアドレスを指定します。「認証を許可するユーザーのメールアドレス」とは、普通は、自分自身の Google アカウントのメールアドレスです。複数のユーザーを許可する場合には、カンマ区切りで複数指定することができます。
企業内で利用する場合には、ALLOWED_EMAILS ではなく、ALLOWED_DOMAIN のように、社内ドメインを指定するように改造を加えることで、社内ユーザーのみがアクセスできるようにすることができますので、検討してください。
services:
  # Lightweight Go OAuth2 Proxy (small-oauth2-proxy)
  # すべてのアクセスはこの軽量プロキシを経由して認証・転送される
  # 認証を通過したユーザーは、Mock MCP Server にアクセスできる
  oauth2-proxy:
    build: ./small-oauth2-proxy
    ports:
      - "8080:4180"
    environment:
      OAUTH2_PROXY_HTTP_ADDRESS: "0.0.0.0:4180"

      # Google OAuth2 / OIDC 設定
      OAUTH2_PROXY_CLIENT_ID: "number-randomstring.apps.googleusercontent.com"
      OAUTH2_PROXY_CLIENT_SECRET: "GOCSPX-randomstring"
      OAUTH2_PROXY_REDIRECT_URL: "http://localhost:8080/oauth2/callback"
      OAUTH2_PROXY_ALLOWED_EMAILS: "email@example.com"

      RESOURCE_URL: "http://localhost:8080/mcp"

      # リダイレクト/中継先 Upstream
      OAUTH2_PROXY_UPSTREAMS: "http://mock-mcp-server:5678"
    depends_on:
      - mock-mcp-server

  # Mock MCP Server (everything)
  # クライアントに何らかの「正しい」レスポンスを返すために、公開されている MCP サーバーのモックを立ち上げる
  mock-mcp-server:
    # See: https://hub.docker.com/r/mcp/everything
    # See: https://github.com/modelcontextprotocol/servers/tree/main/src/everything
    # v x.y.z is tested.
    image: node:alpine
    # command: >
    #   npx -y @modelcontextprotocol/server-everything streamableHttp
    # command: >
    #   sh -c "mkdir -p /tmp/mcp && cd /tmp/mcp && npm init -y && npm install @modelcontextprotocol/server-everything media-typer && npx @modelcontextprotocol/server-everything streamableHttp"
    command: >
      npx -y @modelcontextprotocol/server-everything streamableHttp
    environment:
      PORT: 5678
参考
ヘッダーに渡された Bearer トークンの値等のログの出力がないと、デバッグが難しいです。前段に nginx を配置し、njs というモジュールを組み合わせることで、ヘッダーの値をログに出力することができます。docker-compose_log_nginx.yaml と周辺ファイルを参考にしてください(後述の OAuth2 Proxy と組み合わせた設定例です)。
クライアントの設定例
検証用の MCP クライアントとして Antigravity を使用します。
.gemini/config/mcp_config.json の例は以下の通りです。serverUrl は、接続先の URL を指定します。http://localhost:8080/mcp` のように/mcp` がついていることに注意してください。
{
  "mcpServers": {
    "oauth2-proxy-everything": {
      "oauth": {
        "clientId": "number-randomstring.apps.googleusercontent.com",
        "clientSecret": "GOCSPX-randomstring"
      },
      "serverUrl": "http://localhost:8080/mcp"
    }
  }
}
Antigravity は、(少なくとも、clientId, clientSecret を手動で設定する場合には)リダイレクト先に https://antigravity.google/oauth-callback` を使うように設定されているため、OAuth2 の許可先を追加する必要があります。Authorized redirect URIs にhttps://antigravity.google/oauth-callback` を追加してください。良く使うので `http://localhost:8080/oauth2/callback` も追加しておくと便利です。
認証
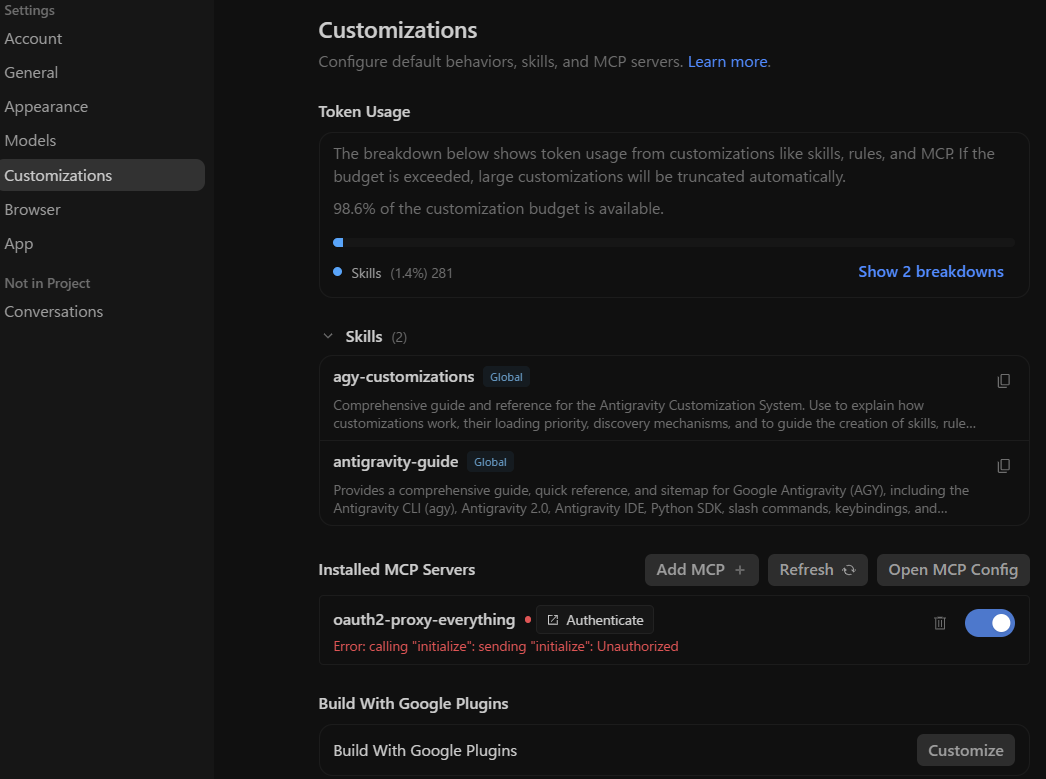
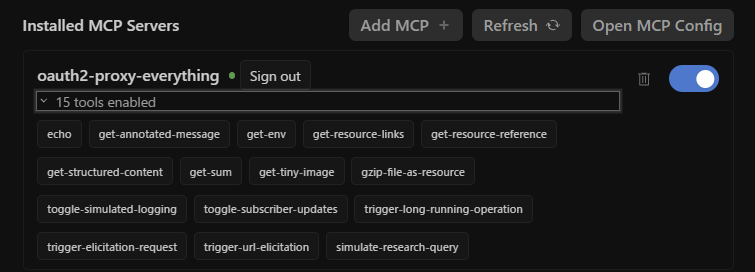
正しく設定ができていれば、Antigravity の設定画面 Customizations > Installed MCP Servers に “oauth2-proxy-everything" が表示されます。Authenticate リンクをクリックすると、ブラウザが立ち上がり、Google アカウントの認証画面が表示されます。認証を行うと、Antigravity の Web 画面が見えます。
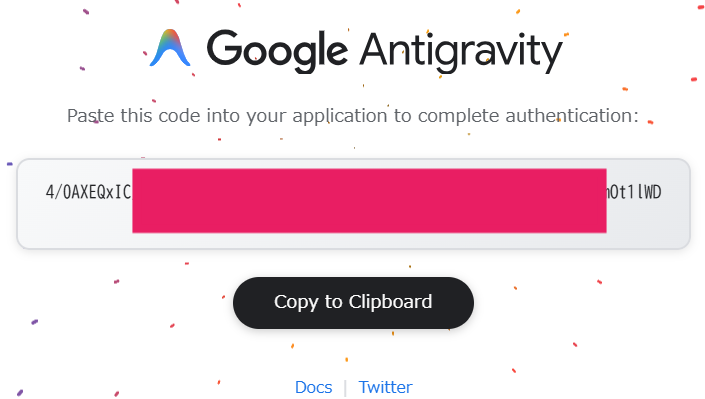
以下のような URL にリダイレクトされ、通常 4/ で始まるトークンが返却されます。コピーして Submit することで認証完了です。ツールが使えるようになっているはずです。
`https://antigravity.google/oauth-callback?state=_state_value_&iss=https%3A%2F%2Faccounts.google.com&scope=email+https%3A%2F%2Fwww.googleapis.com%2Fauth%2Fuserinfo.email+openid&authuser=0&prompt=consent`

会話例 (Antigravity)
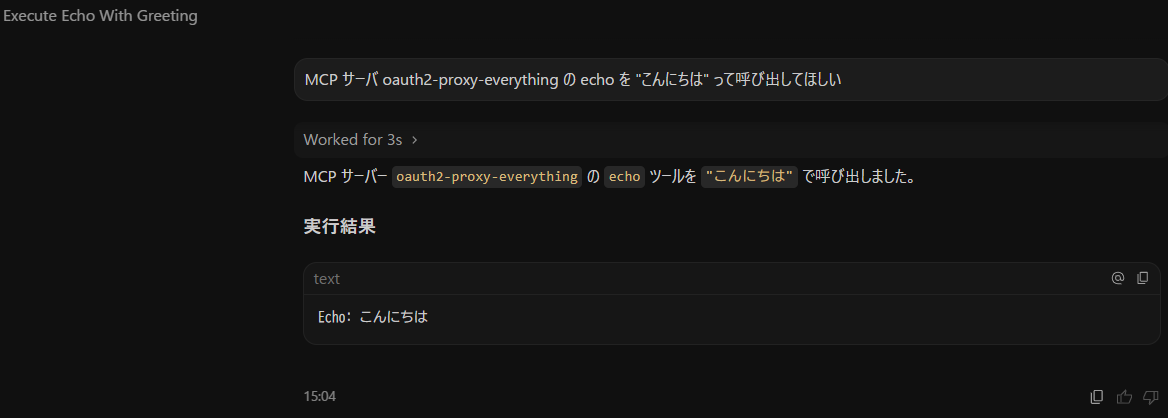
設定が完了していれば、MCP サーバーが提供する機能を tool として呼び出すことができます。
MCP サーバ oauth2-proxy-everything の echo を “こんにちは" って呼び出してほしい
のように対話画面に入力することで、"こんにちは" というレスポンスが返ってきます。
まとめ
本記事の前半では、「MCP クライアント -> MCP サーバー」間の認証、特に認証機能を持たない「共用型」の MCP サーバーに対して、ユーザー単位の認証・認可を後付けで追加する方法を扱いました。
そのために、自作の軽量な OAuth2 Proxy (small-oauth2-proxy) を MCP サーバーの前段に配置します。認証プロバイダーには Google の OAuth2 を利用し、Client ID・Client Secret と、アクセスを許可するメールアドレス(企業内であればドメイン単位を検討してください)を設定するだけで、許可されたユーザーだけが MCP サーバーを利用できるようになります。利用者共通のパスワード(API キー)を配布する方式と異なり、「誰がアクセスしているのか」を識別したうえで認可できる点が利点です。
設定は Docker Compose の環境変数で完結し、MCP クライアント(ここでは Antigravity)側は serverUrl に /mcp 付きの URL を、oauth に Client ID・Client Secret を指定するだけで接続できます。実際に、Authenticate からブラウザでの Google 認証を経てツールが有効化され、echo ツールの呼び出しが成功することも確認しました。
なお、この構成を成立させる鍵は /.well-known/oauth-protected-resource の返却部分にあり、ここに工夫が必要でした(後述)。
クラウド上での接続は試していませんが、原理的に、Cloud Run をサイドカーコンテナ構成にすることで、クラウド上の MCP サーバーに対しても同様の構成が可能です。
/.well-known/oauth-protected-resource の応答内容
serverUrl 等(クライアントによって異なります)に設定した URL が、/.well-known/oauth-protected-resource にアクセスしたレスポンスの resource の値と一致する必要があります(厳密には、/.well-known/oauth-protected-resource/mcp にもアクセスされますが、話が細かくなるので省略します)。今回はメールアドレスによるユーザーの同定を行うため、scopes_supported に email を指定しています。authorization_servers には、OAuth2 プロバイダーの URL を指定します。
{
  "resource": "http://localhost:8080/mcp",
  "authorization_servers": [
    "https://accounts.google.com"
  ],
  "scopes_supported": [
    "email"
  ]
}
OAuth2 Proxy(OSS 失敗例)
OAuth2 Proxy は、OAuth2 認証をサポートするプロキシサーバーです oauth2-proxy_info。リバースプロキシとして動作しながら、認可されたユーザーのみにアクセスを許可することができます。OAuth2 Proxy を利用することで、ログイン機能を持たない Web アプリケーションに、手軽に OAuth2 認証を追加することができます。OAuth2 Proxy は、Google、GitHub、GitLab、Microsoft Entra ID などの OAuth2 プロバイダーと連携して認証を行うことができます OAuth Provider Configuration。
OAuth2 Proxy という OSS では目的を達成できませんでしたので、「上手く行く方法だけが知りたい人」は、本節は読み飛ばしてください。
設定例・設定の流れ
OAuth2
まずは、Client ID と Client Secret を取得します。OAuth2 Proxy では、OAuth2 プロバイダーに登録したアプリケーションの Client ID と Client Secret を使って、ユーザーの認証を行います。
前半と同じですので、省略します。
Docker Compose 形式の設定例
取得したら、OAuth2 Proxy の設定ファイルに記述します。OAuth2 Proxy の設定は環境変数で渡すことができますので、Docker Compose の設定ファイルに YAML 形式で記述することとしました。以下は、Google OAuth2 認証を使う場合の設定例です。
GitHub のリポジトリに同じファイルを置いています docker-compose_log_nginx.yaml ので、そちらも参考にしてください。
企業内で利用する場合には、OAUTH2_PROXY_EMAIL_DOMAINS: "example.com" のように、社内ドメインを指定することで、社内ユーザーのみがアクセスできるようにすることができますので、利用すると設定が簡単になります。個別のユーザーの設定が必要な場合には、OAUTH2_AUTHENTICATED_EMAILS_FILE を使って、認証を許可するユーザーのメールアドレスをファイルで指定することもできると思います。
OAUTH2_PROXY_COOKIE_SECRET は、32 バイトのランダムな文字列を Base64 エンコードした値を指定する必要があります。32 バイトのランダムな文字列は、openssl rand -base64 32 のようにして生成できます。
設定の詳細は oauth2-proxy-config-overview を参照してください。
services:
  # Nginx 前段プロキシ
  # クライアントからのすべてのアクセスを受け、HTTPヘッダーをログに記録した上で oauth2-proxy に転送する
  nginx:
    image: nginx:alpine
    ports:
      - "8080:80"
    volumes:
      - ./nginx.conf:/etc/nginx/nginx.conf:ro
      - ./headers.js:/etc/nginx/headers.js:ro
      - ./static/.well-known:/usr/share/nginx/html/.well-known:ro
    depends_on:
      - oauth2-proxy

  # OAuth2 Proxy (oauth2-proxy)
  # すべてのアクセスは OAuth2 Proxy を経由して認証されるようにする
  # 例外を `SKIP_AUTH_ROUTES` で指定する
  # Upstream は2つ指定している
  #  # 1. 静的なメタデータ返却用のルート(/.well-known/)
  #  # 2. Mock MCP Server (http://mock-mcp-server:5678/)
  # 認証を通過したユーザーは、Mock MCP Server にアクセスできる
  oauth2-proxy:
    # v x.y.z is tested.
    image: quay.io/oauth2-proxy/oauth2-proxy:latest
    environment:
      # See: https://oauth2-proxy.github.io/oauth2-proxy/configuration/overview/
      OAUTH2_PROXY_HTTP_ADDRESS: "0.0.0.0:4180"
      OAUTH2_PROXY_API_ROUTES: "^/mcp"

      # Google OAuth2 / OIDC 設定
      OAUTH2_PROXY_PROVIDER: "oidc"
      OAUTH2_PROXY_OIDC_ISSUER_URL: "https://accounts.google.com"
      # OAUTH2_PROXY_PROVIDER: "google"
      OAUTH2_PROXY_CLIENT_ID: "number-randomstring.apps.googleusercontent.com"
      OAUTH2_PROXY_CLIENT_SECRET: "GOCSPX-randomstring"
      OAUTH2_PROXY_REDIRECT_URL: "http://localhost:8080/oauth2/callback"
      OAUTH2_PROXY_EMAIL_DOMAINS: "*"
      OAUTH2_PROXY_ALLOWED_EMAILS: "email@example.com"

      # メタデータ返却
      # OAUTH2_PROXY_SKIP_AUTH_ROUTES: "^/\\.well-known/oauth-protected-resource,^/mcp,^/mockserver"
      OAUTH2_PROXY_SKIP_AUTH_ROUTES: "^/\\.well-known/oauth-protected-resource"
      OAUTH2_PROXY_UPSTREAMS: 'file:///etc/static/.well-known/#/.well-known/,http://mock-mcp-server:5678/'
      # OAUTH2_PROXY_UPSTREAMS: 'http://mock-mcp-server:5678/'

      # API認証の許可(トークン検証)
      OAUTH2_PROXY_SKIP_JWT_BEARER_TOKENS: "true"
      OAUTH2_PROXY_EXTRA_JWT_ISSUERS: "https://accounts.google.com=aud"

      OAUTH2_PROXY_COOKIE_SECRET: "abcdefghijklmnopqrstuvwxyz123456"
    volumes:
      - ./static/.well-known:/etc/static/.well-known
    # command: ["/bin/oauth2-proxy", "--introspect-token=true", "--introspect-url=https://www.googleapis.com/oauth2/v3/tokeninfo"]

  # Mock MCP Server (everything)
  # クライアントに何らかの「正しい」レスポンスを返すために、公開されている MCP サーバーのモックを立ち上げる
  mock-mcp-server:
    # See: https://hub.docker.com/r/mcp/everything
    # See: https://github.com/modelcontextprotocol/servers/tree/main/src/everything
    # v x.y.z is tested.
    image: node:alpine
    # command: >
    #   npx -y @modelcontextprotocol/server-everything streamableHttp
    # command: >
    #   sh -c "mkdir -p /tmp/mcp && cd /tmp/mcp && npm init -y && npm install @modelcontextprotocol/server-everything media-typer && npx @modelcontextprotocol/server-everything streamableHttp"
    command: >
      npx -y @modelcontextprotocol/server-everything streamableHttp
    environment:
      PORT: 5678
クライアントの設定例
クライアントには Antigravity を利用してみました。
.gemini/config/mcp_config.json の例は以下の通りです。これは前半の例と同じです。serverUrl は、接続先の URL を指定します。http://localhost:8080/mcp` のように/mcp` がついていることに注意してください。
{
  "mcpServers": {
    "oauth2-proxy-everything": {
      "serverUrl": "http://localhost:8080/mcp",
      "oauth": {
        "clientId": "number-randomstring.apps.googleusercontent.com",
        "clientSecret": "GOCSPX-randomstring"
      }
    }
  }
}
認証
省略します。
認証の結果
認証までは進みましたが、ya29 で始まる「アクセストークン」が Antigravity から送信されていました。これは、OAuth2 Proxy が期待する JWT 形式のトークンではありません。OAuth2 Proxy では検証できないことが分かりました。
細かい話は token-types に書いてありますね…。JWT トークンではなく、ユーザーの Google アカウントのアクセストークンが返却されているようです。OAuth2 Proxy は、JWT 形式のトークンを検証することを期待しているため、Antigravity から送信されるアクセストークンでは検証できません。
OAuth2 Proxy にパッチを当てることで、Antigravity から送信されるアクセストークンを検証することも可能ですが、今回はこの検証結果から、軽量プロキシを自作してみる方針に切り替えました。
備考
認証方式の検討
Google Cloud だと、HTTPS サーバーの保護には IAP (Identity-Aware-Proxy) が非常に便利です。しかし、IAP は、MCP クライアントが期待する挙動をしない(MCP サーバーとして、規格通りの動作をしない)部分があるため、そのままでは使えません。Google Gemini CLI は IAP で保護された Cloud Run 等にデプロイされた MCP サーバーにアクセスする機能を有しています Gemini CLI IAP, gemini-cli#8505, service_account_impersonation。しかし、「どんな MCP クライアントでも使える」わけではありません。
SSH によるトンネルや、VPN、汎用的な認証プロキシを使う方法もありますが、ユーザー側に設定を行ったり、サービス(プログラム)の動作を必要とすることが多く、「あらゆるユーザーが気軽に・便利に使える」わけではありません。
一方で、OAuth2 は、特に「ユーザー権限型」の MCP サーバーにおいて、操作先サービスあるいは第三者が、クライアントに指示しているユーザーを認証するために使われており、MCP クライアント(のほとんど)は OAuth2 認証をサポートしています。
(IAP は OAuth2 認証をサポートしていますが、IAP の認証は MCP クライアントが期待する挙動をしない部分があるため、MCP クライアントからのアクセスに使えません。)
OAuth2 Proxy はプロセス・コンテナとしても動作させられ、自由度が高いです。OAuth2 Proxy に一工夫することで、MCP クライアントが期待する挙動をする MCP サーバーとして動作させることができないか?を検討しました。
OAuth2 Proxy + Cloud Run での動作
/.well-known/oauth-protected-resource の部分については、Cloud Storage に oauth-protected-resource という静的ファイル (JSON) を置き、GCSfuse でマウントさせることで、MCP サーバーのコンテナ前段に OAuth2 Proxy を置くだけで、MCP クライアントが期待する挙動をする MCP サーバーとして動作させることができます。
具体的には bucket-name/.well-known に oauth-protected-resource という JSON ファイルを置いておきます。Cloud Run のコンテナのマウント設定で、GCSfuse を使って bucket-name を /etc/static にマウントします。Docker Compose で volumes に ./static/.well-known:/etc/static/.well-known のように設定するのと同じです。後は OAUTH2_PROXY_UPSTREAMS の設定も同じにしておけば、マウントされたバケットのファイルの内容を、そのままレスポンスとして MCP クライアントに返すことができます。
ただし、前述の通り、OAuth2 Proxy は Authorization: Bearer として渡されるアクセストークンの検証に失敗するため、MCP クライアントからのアクセスは失敗します。
参考文献
[oauth2-proxy_info] OAuth2 Proxy とは https://openstandia.jp/oss_info/oauth2-proxy/
[OAuth Provider Configuration] OAuth Provider Configuration https://oauth2-proxy.github.io/oauth2-proxy/configuration/providers/
[Gemini CLI IAP] Gemini CLI から Cloud Run にデプロイした MCP サーバに接続するベストプラクティス https://zenn.dev/kimitsu/articles/gemini-cli-cloud-run-mcp
[gemini-cli#8505] feat(iap support): Add service account impersonation provider to MCPServers to support IAP on Cloud Run https://github.com/google-gemini/gemini-cli/pull/8505
[service_account_impersonation] https://geminicli.com/docs/tools/mcp-server/
[oauth2-proxy-config-overview] Overview https://oauth2-proxy.github.io/oauth2-proxy/configuration/overview
Adding Authentication to Remote MCP Servers Using a Lightweight Proxy
Overview
You can add authentication to an MCP server that has no authentication of its own by using a lightweight OAuth2 proxy. For example, you can safely protect an MCP server that you have launched in the cloud. The /.well-known/oauth-protected-resource part requires some ingenuity. OAuth2 Proxy is feature-rich, but existing tools like OAuth2 Proxy could not achieve this goal due to token verification limitations.
Introduction
This article discusses authentication of the user operating the MCP client, within the “MCP client -> MCP server -> target service" relationship.
In particular, for the “MCP client -> MCP server" part, it introduces a method to authenticate users who access the MCP server, using a custom, lightweight OAuth2 proxy.
Background
Summary of the background
Among “user-privilege type" and “shared type" MCP servers (described below), the “user-privilege type" already has authentication. We want to add authentication to the “shared type."
Details (distinguishing the user-privilege type and the shared type)
When you ask an agent with an embedded LLM to perform “work related to a certain service/software," an MCP server is convenient. If the user is a developer (IT engineer) and has a local command-execution or container environment, they can launch an MCP server locally and have it do the work.
On the other hand, if we also consider non-IT-engineer users, it is useful for a developer on the team, or someone representing the company, to launch an MCP server. Rather than many users each launching an MCP server in their own environment, a remote MCP server is launched, and users access it to request work. Launching an MCP server in each individual environment is inconvenient.
However, when you launch a remote MCP server (one exposed to the internet), you need access control. In other words, authentication and authorization issues arise. If you make it accessible to anyone in the world, a malicious user could use the MCP server to perform unauthorized operations. Therefore, when accessing a remote MCP server, you need to verify the user’s authentication information (in limited situations, IP restrictions are also an option).
There are several kinds of MCP server behavior and authentication, but here we classify them into the following two types and focus on adding authentication to the “shared type":
Classification:
- User-privilege type: operates with the user’s privileges
- Shared type: operates with common privileges (authenticating to the target service with an API key, etc.)
In a “user-privilege type" MCP server, within the “MCP client -> MCP server -> target service" relationship, the target service or a third party authenticates the user instructing the client, and performs operations against the target service “with the privileges of that authenticated user (on behalf of the user)." That is, the MCP server needs to access the target service carrying the user’s authentication information.
Such “user-privilege type" MCP servers have OAuth2 (or similar) authentication supported by the MCP server or the target service. Because authentication and authorization are built in, nothing special is required.
In contrast, a “shared type" MCP server accesses the target service with common privileges, so it does not need to use the user’s authentication information. Conversely, a mechanism to authorize “who is allowed to use that MCP server" is usually not provided. You could use a password common to all users (you might call it an API key), but if it is shared, you cannot track who used the MCP server, and operations such as rotating secrets become difficult. Therefore, you want to add user authentication and authorization when accessing the remote MCP server.
As a “shared type," we assume, for example, an MCP server that receives an issued API key for the target service and registers it via a Secret. Indeed, an “API key" does exist here. However, what we are saying is that sharing a single API key among multiple users in an organization is far from ideal for security and auditing purposes.
The “MCP server -> target service" part is invisible to users. A mechanism to safely hold the API key as a Secret is well established. The problem is the “MCP client -> MCP server" part. Here, instead of a password common to all users, we want to add a mechanism that identifies “who" is accessing and authorizes “whether that person is allowed to access."
Custom Lightweight OAuth2 Proxy
This is different from the well-known “OAuth2 Proxy." The reason we developed this software from scratch is described later, but it is because OAuth2 Proxy could not achieve the goal.
Configuration example and flow
OAuth2
First, obtain a Client ID and Client Secret. In this custom OAuth2 proxy, user authentication is performed using the Client ID and Client Secret of the application registered with the OAuth2 provider.
I prepared a Google Cloud project and decided to use Google Cloud (Google) OAuth2 authentication. You need to create a Google Cloud project, create an OAuth2 client ID, set the redirect URIs, and so on.
For those who have never configured this before, some parts may be difficult, but since it is outside the main topic of this article, I will only explain the necessary parts here and omit the detailed steps.
Make a note of the Client ID and Client Secret.
Add https://antigravity.google/oauth-callback` andhttp://localhost:8080/oauth2/callback` to the Authorized redirect URIs.
Docker Compose configuration example
Once obtained, write it into the configuration file. Since it is configured to receive settings via environment variables, I decided to write it in YAML in a Docker Compose file. The following is a configuration example using Google OAuth2 authentication.
The same file is available in the GitHub repository docker-compose.yaml, so please refer to it as well.
For OAUTH2_PROXY_CLIENT_ID, OAUTH2_PROXY_CLIENT_SECRET, and OAUTH2_PROXY_ALLOWED_EMAILS, specify the Client ID and Client Secret of the application registered with the OAuth2 provider, and the email address of the user allowed to authenticate. The “email address of the user allowed to authenticate" is usually your own Google account’s email address. To allow multiple users, you can specify several separated by commas.
For enterprise use, instead of ALLOWED_EMAILS, consider modifying it to specify an in-house domain, such as ALLOWED_DOMAIN, so that only in-house users can access it.
services:
  # Lightweight Go OAuth2 Proxy (small-oauth2-proxy)
  # All access is authenticated and forwarded through this lightweight proxy
  # Authenticated users can access the Mock MCP Server
  oauth2-proxy:
    build: ./small-oauth2-proxy
    ports:
      - "8080:4180"
    environment:
      OAUTH2_PROXY_HTTP_ADDRESS: "0.0.0.0:4180"

      # Google OAuth2 / OIDC settings
      OAUTH2_PROXY_CLIENT_ID: "number-randomstring.apps.googleusercontent.com"
      OAUTH2_PROXY_CLIENT_SECRET: "GOCSPX-randomstring"
      OAUTH2_PROXY_REDIRECT_URL: "http://localhost:8080/oauth2/callback"
      OAUTH2_PROXY_ALLOWED_EMAILS: "email@example.com"

      RESOURCE_URL: "http://localhost:8080/mcp"

      # Redirect / relay upstream
      OAUTH2_PROXY_UPSTREAMS: "http://mock-mcp-server:5678"
    depends_on:
      - mock-mcp-server

  # Mock MCP Server (everything)
  # Launch a mock of a publicly available MCP server to return some "valid" response to the client
  mock-mcp-server:
    # See: https://hub.docker.com/r/mcp/everything
    # See: https://github.com/modelcontextprotocol/servers/tree/main/src/everything
    # v x.y.z is tested.
    image: node:alpine
    # command: >
    #   npx -y @modelcontextprotocol/server-everything streamableHttp
    # command: >
    #   sh -c "mkdir -p /tmp/mcp && cd /tmp/mcp && npm init -y && npm install @modelcontextprotocol/server-everything media-typer && npx @modelcontextprotocol/server-everything streamableHttp"
    command: >
      npx -y @modelcontextprotocol/server-everything streamableHttp
    environment:
      PORT: 5678
Reference
Without logging the value of the Bearer token passed in the header, debugging is difficult. By placing nginx in front and combining it with a module called njs, you can log header values. Refer to docker-compose_log_nginx.yaml and the surrounding files (this is a configuration example combined with the OAuth2 Proxy described later).
Client configuration example
I tried Antigravity as the client.
An example of .gemini/config/mcp_config.json is shown below. serverUrl specifies the connection URL. Note that /mcp is appended, as in `http://localhost:8080/mcp`.
{
  "mcpServers": {
    "oauth2-proxy-everything": {
      "oauth": {
        "clientId": "number-randomstring.apps.googleusercontent.com",
        "clientSecret": "GOCSPX-randomstring"
      },
      "serverUrl": "http://localhost:8080/mcp"
    }
  }
}
Antigravity is configured to use https://antigravity.google/oauth-callback` as the redirect destination (at least when you set clientId and clientSecret manually), so you need to add it to the OAuth2 allowed destinations. Addhttps://antigravity.google/oauth-callback` to the Authorized redirect URIs. Since it is used often, it is convenient to also add `http://localhost:8080/oauth2/callback`.
Authentication
If configured correctly, “oauth2-proxy-everything" appears in Antigravity’s settings screen under Customizations > Installed MCP Servers. When you click the Authenticate link, a browser launches and the Google account authentication screen appears. After authenticating, you will see the Antigravity web screen.
You are redirected to a URL like the following, and a token that usually starts with 4/ is returned. Copy it and Submit to complete authentication. The tools should now be usable.
`https://antigravity.google/oauth-callback?state=_state_value_&iss=https%3A%2F%2Faccounts.google.com&scope=email+https%3A%2F%2Fwww.googleapis.com%2Fauth%2Fuserinfo.email+openid&authuser=0&prompt=consent`
<img src=/blog/wp-content/uploads/2026/08/antigravity-redirected.png" alt="After the redirect" />
Conversation example (Antigravity)
Once configured, you can call the features provided by the MCP server as tools.
Please call the
echoof the MCP server oauth2-proxy-everything with “こんにちは"
By entering something like the above into the chat, a response of “こんにちは" is returned.
Summary
In the first half of this article, we covered authentication for the “MCP client -> MCP server" segment, specifically a way to add per-user authentication and authorization after the fact to a “shared type" MCP server that has no authentication of its own.
To do so, we place a custom, lightweight OAuth2 proxy (small-oauth2-proxy) in front of the MCP server. Using Google OAuth2 as the authentication provider, simply by configuring the Client ID / Client Secret and the email addresses allowed to access (consider a per-domain setting for enterprises), only permitted users can use the MCP server. Unlike distributing a password (API key) common to all users, the advantage is that you can authorize access after identifying “who is accessing."
The configuration is completed with Docker Compose environment variables, and on the MCP client side (here, Antigravity) you can connect simply by specifying a URL with /mcp in serverUrl and the Client ID / Client Secret in oauth. In fact, we confirmed that after Google authentication in the browser from Authenticate, the tools were enabled and the echo tool call succeeded.
Note that the key to making this configuration work is the response of /.well-known/oauth-protected-resource, which required some ingenuity (described later).
We have not tried connecting in the cloud, but in principle, by using a sidecar container configuration on Cloud Run, the same configuration is possible for an MCP server in the cloud.
Response content of /.well-known/oauth-protected-resource
The URL set in serverUrl etc. (this differs by client) must match the value of resource in the response returned when accessing /.well-known/oauth-protected-resource (strictly speaking, /.well-known/oauth-protected-resource/mcp is also accessed, but that gets into the weeds, so it is omitted). Since we identify users by email address this time, we specify email in scopes_supported. In authorization_servers, specify the URL of the OAuth2 provider.
{
  "resource": "http://localhost:8080/mcp",
  "authorization_servers": [
    "https://accounts.google.com"
  ],
  "scopes_supported": [
    "email"
  ]
}
OAuth2 Proxy (OSS failure example)
OAuth2 Proxy is a proxy server that supports OAuth2 authentication oauth2-proxy_info. While operating as a reverse proxy, it can allow access only to authorized users. By using OAuth2 Proxy, you can easily add OAuth2 authentication to a web application that has no login function. OAuth2 Proxy can authenticate in cooperation with OAuth2 providers such as Google, GitHub, GitLab, and Microsoft Entra ID OAuth Provider Configuration.
Since the OSS OAuth2 Proxy could not achieve the goal, those who “only want to know the method that works" can skip this section.
Configuration example and flow
OAuth2
First, obtain a Client ID and Client Secret. In OAuth2 Proxy, user authentication is performed using the Client ID and Client Secret of the application registered with the OAuth2 provider.
This is the same as the first half, so it is omitted.
Docker Compose configuration example
Once obtained, write it into the OAuth2 Proxy configuration file. Since OAuth2 Proxy settings can be passed via environment variables, I decided to write them in YAML in a Docker Compose file. The following is a configuration example using Google OAuth2 authentication.
The same file is available in the GitHub repository docker-compose_log_nginx.yaml, so please refer to it as well.
For enterprise use, by specifying an in-house domain such as OAUTH2_PROXY_EMAIL_DOMAINS: "example.com", only in-house users can access it, which simplifies configuration. If per-user configuration is needed, you can also use OAUTH2_AUTHENTICATED_EMAILS_FILE to specify the email addresses allowed to authenticate in a file.
OAUTH2_PROXY_COOKIE_SECRET must be a Base64-encoded value of a random 32-byte string. A random 32-byte string can be generated with something like openssl rand -base64 32.
For configuration details, see [oauth2-proxy-config-overview].
services:
  # Nginx front proxy
  # Receives all access from the client, logs the HTTP headers, and then forwards to oauth2-proxy
  nginx:
    image: nginx:alpine
    ports:
      - "8080:80"
    volumes:
      - ./nginx.conf:/etc/nginx/nginx.conf:ro
      - ./headers.js:/etc/nginx/headers.js:ro
      - ./static/.well-known:/usr/share/nginx/html/.well-known:ro
    depends_on:
      - oauth2-proxy

  # OAuth2 Proxy (oauth2-proxy)
  # Ensure all access is authenticated through OAuth2 Proxy
  # Specify exceptions with `SKIP_AUTH_ROUTES`
  # Two upstreams are specified
  #  # 1. A route for returning static metadata (/.well-known/)
  #  # 2. Mock MCP Server (http://mock-mcp-server:5678/)
  # Authenticated users can access the Mock MCP Server
  oauth2-proxy:
    # v x.y.z is tested.
    image: quay.io/oauth2-proxy/oauth2-proxy:latest
    environment:
      # See: https://oauth2-proxy.github.io/oauth2-proxy/configuration/overview/
      OAUTH2_PROXY_HTTP_ADDRESS: "0.0.0.0:4180"
      OAUTH2_PROXY_API_ROUTES: "^/mcp"

      # Google OAuth2 / OIDC settings
      OAUTH2_PROXY_PROVIDER: "oidc"
      OAUTH2_PROXY_OIDC_ISSUER_URL: "https://accounts.google.com"
      # OAUTH2_PROXY_PROVIDER: "google"
      OAUTH2_PROXY_CLIENT_ID: "number-randomstring.apps.googleusercontent.com"
      OAUTH2_PROXY_CLIENT_SECRET: "GOCSPX-randomstring"
      OAUTH2_PROXY_REDIRECT_URL: "http://localhost:8080/oauth2/callback"
      OAUTH2_PROXY_EMAIL_DOMAINS: "*"
      OAUTH2_PROXY_ALLOWED_EMAILS: "email@example.com"

      # Metadata return
      # OAUTH2_PROXY_SKIP_AUTH_ROUTES: "^/\\.well-known/oauth-protected-resource,^/mcp,^/mockserver"
      OAUTH2_PROXY_SKIP_AUTH_ROUTES: "^/\\.well-known/oauth-protected-resource"
      OAUTH2_PROXY_UPSTREAMS: 'file:///etc/static/.well-known/#/.well-known/,http://mock-mcp-server:5678/'
      # OAUTH2_PROXY_UPSTREAMS: 'http://mock-mcp-server:5678/'

      # Allow API authentication (token verification)
      OAUTH2_PROXY_SKIP_JWT_BEARER_TOKENS: "true"
      OAUTH2_PROXY_EXTRA_JWT_ISSUERS: "https://accounts.google.com=aud"

      OAUTH2_PROXY_COOKIE_SECRET: "abcdefghijklmnopqrstuvwxyz123456"
    volumes:
      - ./static/.well-known:/etc/static/.well-known
    # command: ["/bin/oauth2-proxy", "--introspect-token=true", "--introspect-url=https://www.googleapis.com/oauth2/v3/tokeninfo"]

  # Mock MCP Server (everything)
  # Launch a mock of a publicly available MCP server to return some "valid" response to the client
  mock-mcp-server:
    # See: https://hub.docker.com/r/mcp/everything
    # See: https://github.com/modelcontextprotocol/servers/tree/main/src/everything
    # v x.y.z is tested.
    image: node:alpine
    # command: >
    #   npx -y @modelcontextprotocol/server-everything streamableHttp
    # command: >
    #   sh -c "mkdir -p /tmp/mcp && cd /tmp/mcp && npm init -y && npm install @modelcontextprotocol/server-everything media-typer && npx @modelcontextprotocol/server-everything streamableHttp"
    command: >
      npx -y @modelcontextprotocol/server-everything streamableHttp
    environment:
      PORT: 5678
Client configuration example
I tried Antigravity as the client.
An example of .gemini/config/mcp_config.json is shown below. This is the same as the first-half example. serverUrl specifies the connection URL. Note that /mcp is appended, as in `http://localhost:8080/mcp`.
{
  "mcpServers": {
    "oauth2-proxy-everything": {
      "serverUrl": "http://localhost:8080/mcp",
      "oauth": {
        "clientId": "number-randomstring.apps.googleusercontent.com",
        "clientSecret": "GOCSPX-randomstring"
      }
    }
  }
}
Authentication
Omitted.
Authentication result
Authentication proceeded, but an “access token" starting with ya29 was being sent from Antigravity. This is not the JWT-format token that OAuth2 Proxy expects. It turned out that OAuth2 Proxy could not verify it.
The details are described in token-types. It appears that, rather than a JWT token, the user’s Google account access token is returned. Because OAuth2 Proxy expects to verify a JWT-format token, it cannot verify the access token sent from Antigravity.
It is also possible to patch OAuth2 Proxy to verify the access token sent from Antigravity, but this time, based on this verification result, we switched to the approach of building a lightweight proxy ourselves.
Notes
Considering authentication methods
On Google Cloud, IAP (Identity-Aware Proxy) is very convenient for protecting HTTPS servers. However, IAP has parts that do not behave as an MCP client expects (it does not operate according to the MCP server specification), so it cannot be used as-is. Google Gemini CLI has the ability to access an MCP server deployed on IAP-protected Cloud Run, etc. Gemini CLI IAP, gemini-cli#8505, service_account_impersonation. However, it is not the case that “any MCP client can use it."
There are also methods using SSH tunnels, VPNs, or general-purpose authentication proxies, but they often require configuration on the user side or the operation of a service (program), so it is not the case that “any user can use it easily and conveniently."
On the other hand, OAuth2 is used, especially in “user-privilege type" MCP servers, for the target service or a third party to authenticate the user instructing the client, and (most) MCP clients support OAuth2 authentication.
(IAP supports OAuth2 authentication, but because IAP’s authentication has parts that do not behave as an MCP client expects, it cannot be used for access from MCP clients.)
OAuth2 Proxy can be run as a process or a container and is highly flexible. We considered whether, with a little ingenuity, OAuth2 Proxy could be made to operate as an MCP server that behaves as MCP clients expect.
Operation with OAuth2 Proxy + Cloud Run
For the /.well-known/oauth-protected-resource part, by placing a static file (JSON) named oauth-protected-resource in Cloud Storage and mounting it with GCSfuse, you can operate as an MCP server that behaves as MCP clients expect simply by placing OAuth2 Proxy in front of the MCP server container.
Specifically, place a JSON file named oauth-protected-resource in bucket-name/.well-known. In the Cloud Run container mount settings, use GCSfuse to mount bucket-name to /etc/static. This is the same as setting ./static/.well-known:/etc/static/.well-known in volumes in Docker Compose. Then, if you keep the OAUTH2_PROXY_UPSTREAMS setting the same, you can return the contents of the mounted bucket’s file as-is as the response to the MCP client.
However, as described above, OAuth2 Proxy fails to verify the access token passed as Authorization: Bearer, so access from the MCP client fails.
References
[oauth2-proxy_info] What is OAuth2 Proxy https://openstandia.jp/oss_info/oauth2-proxy/
[OAuth Provider Configuration] OAuth Provider Configuration https://oauth2-proxy.github.io/oauth2-proxy/configuration/providers/
[Gemini CLI IAP] Best practices for connecting from Gemini CLI to an MCP server deployed on Cloud Run https://zenn.dev/kimitsu/articles/gemini-cli-cloud-run-mcp
[gemini-cli#8505] feat(iap support): Add service account impersonation provider to MCPServers to support IAP on Cloud Run https://github.com/google-gemini/gemini-cli/pull/8505
[service_account_impersonation] https://geminicli.com/docs/tools/mcp-server/
[oauth2-proxy-config-overview] Overview https://oauth2-proxy.github.io/oauth2-proxy/configuration/overview
[token-types] Token types https://docs.cloud.google.com/docs/authentication/token-types?hl=en