Dynamically Managing Google Groups Members with Cloud Identity Groups API
Cloud Identity Groups API を使って Google Groups のメンバーを動的に管理する
English follows Japanese.
まとめ
この記事では、Cloud Identity Groups API を利用して、スプレッドシートのデータに基づいて Google Groups のメンバーを自動的に追加・削除するシステムを紹介します。
https://github.com/takotakot/misc/tree/main/group-from-sheet でソースコードを公開しています。
スライドは Google Slide https://docs.google.com/presentation/d/1jsCtTDSjSIWmad2vs777Hs6Kxt4Cqq5R5f8c02jW90I/edit?slide=id.g3b44be7cb97_0_63#slide=id.g3b44be7cb97_0_63 をご覧ください。
動画でご覧になりたい方は、YouTube 動画 https://youtu.be/2b1NJEPaYmY をご覧ください。
- 有効期間ベースの管理: 開始時刻と終了時刻を指定することで、期間限定のメンバーシップを実現
- 宣言的調整(Declarative Reconciliation): スプレッドシートを「正」とし、グループの状態を常にシートに合わせる
- GAS + TypeScript: Google Apps Script を TypeScript で開発し、型安全性を確保
スプレッドシートは以下の構造にしてください:
データ管理用シート(シート名: 同期リスト):
| A列: グループメール | B列: メンバーメール | C列: 開始時刻 | D列: 終了時刻 | E列: メンバーシップ名 |
|---|---|---|---|---|
| group@example.com | user1@example.com | 2025/01/01 09:00 | 2025/12/31 23:59 | (自動入力) |
| group@example.com | user2@example.com | 2025/06/01 00:00 | 2025/06/30 23:59 | (自動入力) |
設定用シート(シート名: システム設定):
B1: ロックセル(「ON」または空欄)B2: 最終操作時刻(自動更新)
はじめに
みなさん、Google Groups のメンバー管理、どうしていますか?
少人数のグループであれば、手動で追加・削除するのも苦ではありません。しかし、プロジェクトごとにグループを作成していたり、期間限定でメンバーを追加したい場合には、管理が煩雑になりがちです。「あの人、いつまでこのグループにいるんだっけ?」「外すの忘れてた…」という経験、ありませんか?
今回は、Cloud Identity Groups API を利用して、スプレッドシートに記載したメンバー情報を基に、Google Groups のメンバーを自動的に同期するシステムを作成しました。開始時刻と終了時刻を設定することで、「この期間だけグループに追加する」という運用が可能になります。
導入方法
導入方法はとてもシンプルで、以下を行うだけです。
- シートを作成
- エディタ画面の「サービス」から、
CloudIdentityGroupsを追加 - ソースコードを貼り付け
- プロジェクトの設定で、タイムゾーンを設定
- スクリプトプロパティ
EXCLUDED_USERSに、除外するユーザーを設定 onTimeTriggerd関数にトリガーを設定
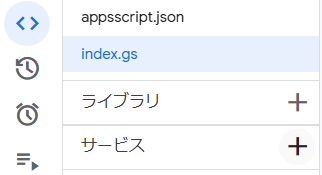
まず、スプレッドシートに、2つ、シートを作成します。シート名はシステムで定めています。
2番目に、拡張機能の Apps Script から GAS の設定画面に移動し、エディタ画面の「サービス」から、CloudIdentityGroups を追加します。
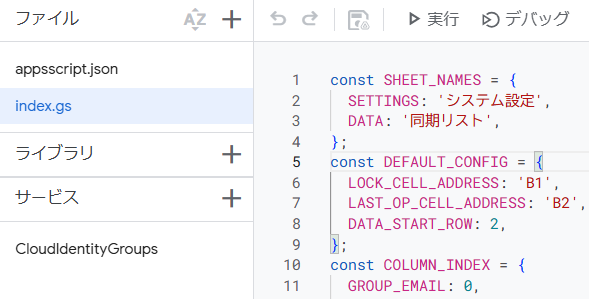
3番目に、ソースコードを貼り付けます。GitHub リポジトリに、貼り付けられる状態のソースコードを用意していますので、そのまま貼り付けてください。
4番目に、プロジェクトの設定から、タイムゾーンを設定します。
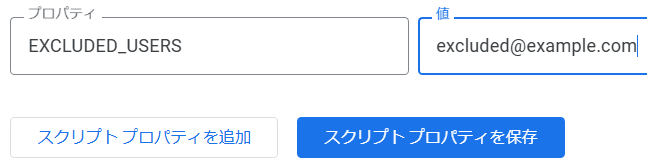
5番目に、プロジェクトの設定から、スクリプトプロパティ EXCLUDED_USERS に、除外するユーザーをカンマ区切りで設定します。実行ユーザー自身がリストになくても削除しないための仕組みです。
最後に、トリガー画面からトリガーを追加し、onTimeTriggerd 関数にトリガーを設定します。5分毎に起動するように設定しておくのがお勧めです。
スプレッドシートに、「グループ同期」メニューを追加してあります。テストのときには手動実行も便利です。


なぜ Cloud Identity Groups API を選んだのか
Google Groups の管理には従来から Google Admin SDK の Directory API(admin.googleapis.com)を使う方法もあります。今回、Cloud Identity Groups API(cloudidentity.googleapis.com)を採用した大きな理由は、Google Workspace の管理者権限がなくても利用できるという点です。
Directory API でグループのメンバーを操作するには、通常 Google Workspace の管理者権限が必要です [Cloud IdentityでGoogleグループからメンバーを追加・削除するGoogle Apps Scriptを書いた]。一方、Cloud Identity Groups API では、対象グループの Manager 以上のロールを持っていれば、誰でもメンバーの追加・削除ができます。これは、部門やプロジェクト単位でグループ管理を委任したい場合に非常に便利です。
その他にも、Cloud Identity Groups API には以下のようなメリットがあります。
- Google Workspace だけでなく Cloud Identity を使う環境でも利用可能
- メンバーシップの有効期限設定(Expiry)など、より細かな制御が可能
- モダンな REST API 設計
PAM(特権アクセス管理)の代替として
このシステムは、簡易的な PAM(Privileged Access Management) としても活用できます。
Google Cloud には Privileged Access Manager というサービスがありますが、これは主に Google Cloud の IAM ロールに対する一時的な権限昇格を管理するものです。
しかし、PAM にはいくつかの制限があります:
- PAM で制御しにくい / できないリソースがある:
- Google Drive: ファイルへのアクセス権は IAM ロールではないため、PAM の対象外です。
- IAP (SSH/TCP): IAP-secured Tunnel を特定の IP 範囲(Access Level)に制限したい場合、手動での IAM Condition 式の記述が必要です。PAM の動的権限付与の中で管理することはできません。事前に IP 範囲等とともに設定したグループで管理する方が遥かにシンプルです(参考: Issue 274953344)。
- 注: 組織や(Identity の)フォルダには PAM の設定が可能です
- PAM で付与できない権限がある: 一部の基本ロール(オーナー等)や特定の権限は、PAM 経由では付与できません
- 承認ワークフローが必須: PAM は承認プロセスを経る設計になっており、シンプルな時限付きアクセスには過剰な場合があります
- 注: 無条件承認も可能です
一方で、「特定の期間だけグループに追加し、そのグループ経由でリソースへのアクセス権を付与する」というアプローチであれば、これらの制限を回避できます。例えば:
- Google Drive の共有フォルダへのアクセスを期間限定で付与
- IAP で保護されたアプリケーションへのアクセスを期間限定で許可
- PAM でも行えますが、以下も簡単です
- プロジェクト期間中だけ、特定の GCS バケットや BigQuery データセットへのアクセスを許可
- 外部ベンダーのエンジニアに、契約期間中のみ開発環境へのアクセスを付与
- 監査対応などで、一時的に特定のリソースへのアクセスを許可
このようなケースでは、グループに IAM ポリシーや共有設定を付与しておき、スプレッドシートで「いつからいつまで」を管理するだけで、簡易的な時限付きアクセス制御を実現できます。PAM の制限に該当するケースや、フルの PAM ソリューションを導入するほどではない小規模なケースで、このアプローチは特に有効です。
システムの概要
技術スタック
このシステムは以下の技術で構成されています。
- Google Apps Script (GAS): 実行環境
- TypeScript: 型安全な開発
- Cloud Identity Groups API: グループメンバーの操作
- Google Sheets: メンバー情報の管理
全体の流れ
- スプレッドシートにメンバー情報(グループメール、メンバーメール、開始時刻、終了時刻)を記載
- GAS のトリガーが定期的(例: 5分ごと)に実行される
- 各グループについて、「あるべき状態」と「現在の状態」を比較
- 差分を計算し、追加・削除を実行
- 結果をスプレッドシートに書き戻す
この「あるべき状態と現在の状態を比較して差分を適用する」パターンは、宣言的調整(Declarative Reconciliation)と呼ばれ、Kubernetes のコントローラなどでも採用されている設計パターンです。
実装の詳細
Cloud Identity Groups API の利用
まず、Cloud Identity Groups API を使うための準備について説明しましょう。
GAS で Cloud Identity Groups API を使うには、「Advanced Service」として追加する必要があります。GAS エディタで「サービス」→「サービスを追加」をクリックし、「Cloud Identity Groups API」を検索して追加してください。識別子は CloudIdentityGroups に設定します。
グループを操作するには、まずグループのリソース名(groups/{group_id} の形式)を取得する必要があります。これは lookup メソッドで行います。
export const lookupGroup = (groupEmail: GroupEmail): GroupName | null => {
  try {
    const response = CloudIdentityGroups.Groups.lookup({
      'groupKey.id': groupEmail,
    });

    return (response?.name as GroupName) || null;
  } catch (e) {
    return null; // 詳細は GitHub 参照
  }
};メンバーの一覧取得も同様に実装できます。実際には、ページネーションに対応するため、nextPageToken が返される限りループを続ける必要があります。GitHub のソースコードを参照してください。
export const listMembers = (groupName: GroupName): MembershipInfo[] => {
  const members: MembershipInfo[] = [];

  try {
    // 実際には、ページングを利用してください。GitHub 参照
    const response = CloudIdentityGroups.Groups.Memberships.list(groupName);

    if (response.memberships) {
      for (const membership of response.memberships) {
        const email = membership.preferredMemberKey?.id;
        if (email) {
          members.push({
            name: membership.name,
            email,
          });
        }
      }
    }

    return members;
  } catch (e) {
    return []; // 詳細は GitHub 参照
  }
};
メンバーの追加と削除
メンバーの追加には Memberships.create を使用します。追加したいユーザーのメールアドレスと、付与したいロール(通常は MEMBER)を指定します。
export const addMember = (
  groupName: GroupName,
  memberEmail: MemberEmail
): MembershipInfo | null => {
  try {
    const membership = {
      preferredMemberKey: { id: memberEmail },
      roles: [{ name: 'MEMBER' }],
    };

    const result = CloudIdentityGroups.Groups.Memberships.create(
      membership,
      groupName
    );

    if (result && result.response) {
      Logger.log(`メンバーを追加しました: ${memberEmail}`);
      return {
        name: result.response.name,
        email: memberEmail,
      };
    }
    return null;
  } catch (e) {
    return null; // 詳細は GitHub 参照
  }
};削除を行う際には、少し注意が必要です。Memberships.remove を実行するには、メンバーのメールアドレスではなく、「メンバーシップのリソース名(Relation ID)」(groups/.../memberships/... の形式)を指定しなければなりません。
これを特定するために Memberships.lookup を使用します。
const getMembershipName = (
  groupName: GroupName,
  memberEmail: MemberEmail
): MembershipName | null => {
  try {
    const response = CloudIdentityGroups.Groups.Memberships.lookup(groupName, {
      'memberKey.id': memberEmail,
    });
    return (response?.name as MembershipName) || null;
  } catch (e) {
    return null; // 存在しない場合は null
  }
};
この ID を取得できれば、あとは Memberships.remove を呼び出すだけです。
同期ロジック
同期のコア部分は、「あるべき状態」と「現在の状態」の差分を計算するロジックです。
export const calculateDesiredState = (
  rows: SheetRow[],
  currentTime: Date,
  excludedUsers: Set<MemberEmail>
): Set<MemberEmail> => {
  const desiredEmails = rows
    .filter(row => !excludedUsers.has(row.memberEmail))
    .filter(row => row.startTime <= currentTime && currentTime <= row.endTime)
    .map(row => row.memberEmail);

  return new Set<MemberEmail>(desiredEmails);
};

export const calculateDiff = (
  desired: Set<MemberEmail>,
  actual: Set<MemberEmail>
): { toAdd: MemberEmail[]; toRemove: MemberEmail[] } => {
  const toAdd = [...desired].filter(email => !actual.has(email));
  const toRemove = [...actual].filter(email => !desired.has(email));

  return { toAdd, toRemove };
};
calculateDesiredState では、現在時刻が開始時刻と終了時刻の範囲内にある行のみを「あるべきメンバー」として抽出しています。また、管理者など操作除外ユーザーはフィルタで除外します。
calculateDiff では、集合演算を用いて追加・削除が必要なメンバーを計算しています。シンプルですが、この設計により「スプレッドシートの状態が正」という宣言的なモデルを実現できます。
排他制御
複数の実行が同時に走ると、予期しない動作が発生する可能性があります。そのため、二重のロック機構を実装しています。
- シートロック: スプレッドシート上の特定セル (B1) に「ON」と入力されている場合、処理をスキップ
- ScriptLock: GAS の
LockServiceを使った排他制御
これにより、手動でシートを編集したい場合は B1 セルに「ON」と入力するだけで、システムの動作を一時停止できます。
セットアップ
1. スプレッドシートの準備
以下の構造でスプレッドシートを作成してください。
データ管理用シート(シート名: 同期リスト、再掲):
| A列: グループメール | B列: メンバーメール | C列: 開始時刻 | D列: 終了時刻 | E列: メンバーシップ名 |
|---|---|---|---|---|
| group@example.com | user1@example.com | 2025/01/01 09:00 | 2025/12/31 23:59 | (自動入力) |
| group@example.com | user2@example.com | 2025/06/01 00:00 | 2025/06/30 23:59 | (自動入力) |
設定用シート(シート名: システム設定):
B1: ロックセル(「ON」または空欄)B2: 最終操作時刻(自動更新)
2. デプロイ
# 依存関係のインストール
npm install

# TypeScript のビルド
npm run build

# GAS プロジェクトにデプロイ
npm run deploy
3. トリガーの設定
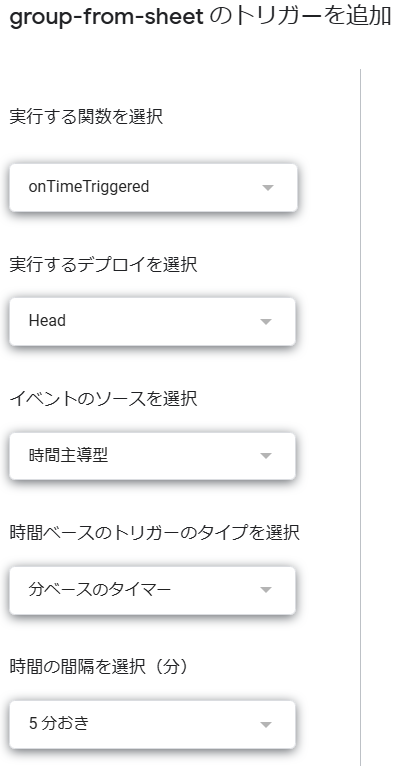
GAS エディタで以下のトリガーを設定してください。
- 実行する関数:
onTimeTriggered - イベントのソース: 時間主導型
- 時間ベースのトリガーのタイプ: 分ベースのタイマー
- 時間の間隔: 5分おき
運用上の注意点
操作除外ユーザー
グループのオーナーや管理者など、システムによる操作を除外したいユーザーがいる場合は、スクリプトプロパティ EXCLUDED_USERS にカンマ区切りでメールアドレスを設定してください。
API クォータ
Cloud Identity Groups API には利用制限があります。大量のグループやメンバーを管理する場合は、トリガーの間隔を調整するなどの工夫が必要になるかもしれません。
重要: googlegroups.com ドメインのグループは対象外
これは実際にハマった点なので、特に強調しておきます。
Cloud Identity Groups API は、@googlegroups.com ドメインのグループを操作できません。
例えば、my-group@googlegroups.com というグループに対して lookup を実行すると、以下のようなエラーが発生します。
グループの検索中にエラーが発生しました (my-group@googlegroups.com):
API call to cloudidentity.groups.lookup failed with error:
Error(2028): Permission denied for resource my-group@googlegroups.com (or it may not exist).
これは、Cloud Identity Groups API が Google Workspace または Cloud Identity 上で管理されている「組織のグループ」 を対象としているためです。一般の Google アカウントで作成した googlegroups.com のグループは、組織のアイデンティティ管理外にあるため、この API では操作できません。
対象のグループが @googlegroups.com ではなく、自組織のドメイン(例: @example.com)で作成されていることを確認してください。Google Workspace の管理コンソール(admin.google.com)からグループを作成するか、groups.google.com から、ドメインを指定してグループを作成すれば、組織のドメインのグループとして扱われます。
まとめ
この記事では、Cloud Identity Groups API を利用して、スプレッドシートベースで Google Groups のメンバーを動的に管理するシステムを紹介しました。
- Cloud Identity Groups API の基本的な使い方(lookup、listMembers、create、remove)
- 宣言的調整パターンによる同期ロジックの設計
- 排他制御の実装方法
このアプローチは、期間限定のプロジェクトチームや、定期的にメンバーが入れ替わるグループの管理に特に有効です。スプレッドシートを編集するだけで、自動的にグループのメンバーが更新されるので、管理の手間を大幅に削減できます。
参考
- Cloud Identity Groups APIhttps://cloud.google.com/identity/docs/reference/rest
- Groups Service から Cloud Identity Groups Advanced Service に移行するhttps://developers.google.com/apps-script/migration/groups-cig?hl=ja
- Google Apps Script – LockServicehttps://developers.google.com/apps-script/reference/lock
- Kubernetes – Controller Patternhttps://kubernetes.io/docs/concepts/architecture/controller/
- ja: Kubernetes – Controller Patternhttps://kubernetes.io/ja/docs/concepts/architecture/controller/
- Cloud IdentityでGoogleグループからメンバーを追加・削除するGoogle Apps Scriptを書いたhttps://zenn.dev/ohsawa0515/articles/cloud-identity-gas
- Cloud Identity APIでGoogle Workspaceのグループ(Google Groups)を操作するhttps://qiita.com/nobrin/items/e5594150ee99a705c553
- Google Apps Scriptでグループアドレスの作成・削除を行う【GAS】http://officeforest.org/wp/google-apps-scriptでグループを作成する/
Dynamically Managing Google Groups Members with Cloud Identity Groups API
Summary
This article introduces a system that automatically adds and removes Google Groups members based on spreadsheet data using the Cloud Identity Groups API.
All code is available on GitHub:
https://github.com/takotakot/misc/tree/main/group-from-sheet
Slide is available on Google Slide:
https://docs.google.com/presentation/d/1jsCtTDSjSIWmad2vs777Hs6Kxt4Cqq5R5f8c02jW90I/edit?slide=id.g3b44be7cb97_0_63#slide=id.g3b44be7cb97_0_63
YouTube video is available:
https://youtu.be/2b1NJEPaYmY
- Time-based Management: Enable time-limited memberships by specifying start and end times
- Declarative Reconciliation: Treat the spreadsheet as the "source of truth" and keep group state consistent
- GAS + TypeScript: Develop with Google Apps Script in TypeScript for type safety
Set up your spreadsheet with the following structure:
Data Management Sheet (Sheet name: 同期リスト):
| Column A: Group Email | Column B: Member Email | Column C: Start Time | Column D: End Time | Column E: Membership Name |
|---|---|---|---|---|
| group@example.com | user1@example.com | 2025/01/01 09:00 | 2025/12/31 23:59 | (Auto-filled) |
| group@example.com | user2@example.com | 2025/06/01 00:00 | 2025/06/30 23:59 | (Auto-filled) |
Settings Sheet (Sheet name: システム設定):
B1: Lock Cell ("ON" or empty)B2: Last Operation Time (Auto-updated)
Introduction
How are you managing your Google Groups members?
For small groups, manually adding and removing members isn’t too much trouble. However, when creating groups for each project or wanting to add members for a limited time, management can become cumbersome. Ever had the experience of "Wait, how long is this person supposed to be in this group?" or "Oops, forgot to remove them…"?
In this article, I created a system that automatically synchronizes Google Groups members based on member information written in a spreadsheet using the Cloud Identity Groups API. By setting start and end times, you can implement operations like "add to group only during this period."
How to Set Up
The setup process is very simple; just follow the steps below:
- Create the sheets.
- Add
CloudIdentityGroupsfrom "Services" in the Apps Script editor. - Paste the source code.
- Set the time zone in the project settings.
- Set the
EXCLUDED_USERSscript property. - Set a trigger for the
onTimeTriggerdfunction.
First, create two sheets in your spreadsheet. The sheet names are predefined by the system.
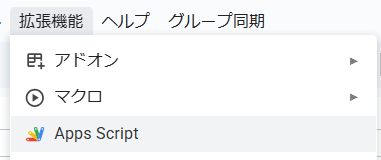
Second, go to the Apps Script editor from "Extensions" and add CloudIdentityGroups from "Services" in the editor screen.
Third, paste the source code. The source code ready for pasting is available in the GitHub repository, so please use it as is.
Fourth, set the time zone from the project settings.
Fifth, set the email addresses of users you want to exclude, separated by commas, in the EXCLUDED_USERS script property. This prevents the execution user from being removed even if they are not in the list.
Finally, add a trigger from the trigger screen and set it for the onTimeTriggerd function. We recommend setting it to run every 5 minutes.
A "Group Sync" menu has been added to the spreadsheet. Manual execution via this menu is also convenient for testing.
Why Cloud Identity Groups API?
While Google Admin SDK’s Directory API has traditionally been used for managing Google Groups, I chose Cloud Identity Groups API for one major reason: you don’t need Google Workspace admin rights to use it.
Directory API requires Google Workspace admin privileges to manage group members [Wrote a Google Apps Script to add/remove members from Google Groups with Cloud Identity (Japanese)]. With Cloud Identity Groups API, however, anyone with Manager role or above on the target group can add and remove members. This is extremely useful when you want to delegate group management at the department or project level.
Additional benefits of Cloud Identity Groups API include:
- Works with Cloud Identity environments, not just Google Workspace
- Finer control like membership expiry settings
- Modern REST API design
As an Alternative to PAM (Privileged Access Management)
This system can also be used as a lightweight PAM (Privileged Access Management) solution.
Google Cloud offers Privileged Access Manager, but it primarily manages temporary privilege escalation for Google Cloud IAM roles.
However, PAM has several limitations:
- Incompatibility or Difficulty with Certain Resources:
- Google Drive: Access to shared folders is not managed via IAM roles and is therefore outside PAM’s scope.
- IAP (SSH/TCP): Restricting IAP-secured Tunnels to specific IP ranges (Access Levels) requires manual IAM Condition expressions. Such restrictions cannot be managed within PAM’s dynamic entitlements. It is much simpler to manage access via a group that has been pre-configured with the corresponding IP ranges and conditions (Reference: Issue 274953344).
- Note: PAM can be configured at the organization or folder level.
- Some permissions cannot be granted via PAM: Certain basic roles (like Owner) and specific permissions cannot be granted through PAM.
- Approval workflow is required: PAM is designed with an approval process, which can be overkill for simple time-limited access.
- Note: Unconditional approval is possible.
With the approach of "adding someone to a group for a specific period and granting resource access through that group," you can work around these limitations. For example:
- Allow access to specific GCS buckets or BigQuery datasets only during a project period
- Grant external vendor engineers access to development environments only during their contract period
- Temporarily allow access to specific resources for audit purposes
- Grant time-limited access to Google Drive shared folders
- Allow time-limited access to IAP-protected applications
In such cases, you can achieve lightweight time-limited access control by assigning IAM policies or sharing settings to groups and managing "from when to when" in a spreadsheet. This approach is particularly effective for cases that hit PAM’s limitations, or for smaller-scale cases where deploying a full PAM solution would be overkill.
System Overview
Technology Stack
This system consists of the following technologies:
- Google Apps Script (GAS): Runtime environment
- TypeScript: Type-safe development
- Cloud Identity Groups API: Group member operations
- Google Sheets: Member information management
Overall Flow
- Write member information (group email, member email, start time, end time) in the spreadsheet
- GAS trigger runs periodically (e.g., every 5 minutes)
- For each group, compare "desired state" with "current state"
- Calculate the diff and execute additions/removals
- Write results back to the spreadsheet
This pattern of "comparing desired state with current state and applying the diff" is called Declarative Reconciliation, a design pattern also adopted by Kubernetes controllers.
Implementation Details
Using Cloud Identity Groups API
Let me explain the preparation for using the Cloud Identity Groups API.
To use the Cloud Identity Groups API in GAS, you need to add it as an "Advanced Service." Click "Services" → "Add a service" in the GAS editor, search for "Cloud Identity Groups API" and add it. Set the identifier to CloudIdentityGroups.
To operate on groups, you first need to get the group’s resource name (in the format groups/{group_id}). This is done with the lookup method.
export const lookupGroup = (groupEmail: GroupEmail): GroupName | null => {
  try {
    const response = CloudIdentityGroups.Groups.lookup({
      'groupKey.id': groupEmail,
    });
    return (response?.name as GroupName) || null;
  } catch (e) {
    return null; // Refer to GitHub for details
  }
};
Listing members can be implemented similarly.
export const listMembers = (groupName: GroupName): MembershipInfo[] => {
  const members: MembershipInfo[] = [];
  try {
    // In practice, please implement pagination. Refer to GitHub for details.
    const response = CloudIdentityGroups.Groups.Memberships.list(groupName);

    if (response.memberships) {
      for (const membership of response.memberships) {
        const email = membership.preferredMemberKey?.id;
        if (email) {
          members.push({ name: membership.name, email });
        }
      }
    }

    return members;
  } catch (e) {
    return []; // Refer to GitHub for details
  }
};
To add a member, use Memberships.create. Specify the email address and the role (usually MEMBER).
export const addMember = (
  groupName: GroupName,
  memberEmail: MemberEmail
): MembershipInfo | null => {
  try {
    const membership = {
      preferredMemberKey: { id: memberEmail },
      roles: [{ name: 'MEMBER' }],
    };

    const result = CloudIdentityGroups.Groups.Memberships.create(membership, groupName);

    if (result && result.response) {
      return { name: result.response.name, email: memberEmail };
    }
    return null;
  } catch (e) {
    return null; // Refer to GitHub for details
  }
};
When removing a member, you need to be a bit careful. To execute Memberships.remove, you must specify the "Membership Resource Name (Relation ID)" (in the format groups/.../memberships/...) instead of the member’s email address.
To identify this, use Memberships.lookup.
const getMembershipName = (
  groupName: GroupName,
  memberEmail: MemberEmail
): MembershipName | null => {
  try {
    const response = CloudIdentityGroups.Groups.Memberships.lookup(groupName, {
      'memberKey.id': memberEmail,
    });
    return (response?.name as MembershipName) || null;
  } catch (e) {
    return null; // Return null if it doesn't exist
  }
};
Once you have this ID, you just need to call Memberships.remove.
Synchronization Logic
The core part of synchronization is the logic that calculates the diff between "desired state" and "current state."
export const calculateDesiredState = (
  rows: SheetRow[],
  currentTime: Date,
  excludedUsers: Set<MemberEmail>
): Set<MemberEmail> => {
  const desiredEmails = rows
    .filter(row => !excludedUsers.has(row.memberEmail))
    .filter(row => row.startTime <= currentTime && currentTime <= row.endTime)
    .map(row => row.memberEmail);

  return new Set<MemberEmail>(desiredEmails);
};

export const calculateDiff = (
  desired: Set<MemberEmail>,
  actual: Set<MemberEmail>
): { toAdd: MemberEmail[]; toRemove: MemberEmail[] } => {
  const toAdd = [...desired].filter(email => !actual.has(email));
  const toRemove = [...actual].filter(email => !desired.has(email));

  return { toAdd, toRemove };
};
calculateDesiredState extracts only the rows where the current time is within the start and end time range as "desired members." It also filters out excluded users like administrators.
calculateDiff uses set operations to calculate the members that need to be added or removed. Simple, but this design enables a declarative model where "the spreadsheet state is the truth."
Exclusive Control
When multiple executions run simultaneously, unexpected behavior may occur. Therefore, a dual locking mechanism is implemented:
- Sheet Lock: Skips processing if a specific cell (B1) on the spreadsheet contains "ON".
- ScriptLock: Concurrent control using GAS
LockService.
This allows you to pause the system by simply entering "ON" in cell B1 whenever you need to edit the spreadsheet manually.
Setup
1. Prepare Spreadsheet
Create a spreadsheet with the following structure:
Data Management Sheet (Sheet name: 同期リスト, reprinted):
| Column A: Group Email | Column B: Member Email | Column C: Start Time | Column D: End Time | Column E: Membership Name |
|---|---|---|---|---|
| group@example.com | user1@example.com | 2025/01/01 09:00 | 2025/12/31 23:59 | (Auto-filled) |
| group@example.com | user2@example.com | 2025/06/01 00:00 | 2025/06/30 23:59 | (Auto-filled) |
2. Deploy
# Install dependencies
npm install

# Build TypeScript
npm run build

# Deploy to GAS project
npm run deploy
3. Trigger Settings
Set the following trigger in the GAS editor:
- Function to run:
onTimeTriggered - Event source: Time-driven
- Type of time based trigger: Minutes timer
- Minute interval: Every 5 minutes
Operational Notes
Excluded Users
If there are users you want to exclude from system operations, such as group owners or administrators, set their email addresses in the script property EXCLUDED_USERS, separated by commas.
API Quotas
The Cloud Identity Groups API has usage limits. When managing a large number of groups or members, you may need to adjust the trigger interval.
Important: googlegroups.com Groups Are Not Supported
This is an important point that I actually stumbled upon, so I want to emphasize it.
Cloud Identity Groups API cannot operate on groups with the @googlegroups.com domain.
For example, if you run lookup on a group like my-group@googlegroups.com, you will get an error like this (translated from Japanese):
Error searching for group (my-group@googlegroups.com):
API call to cloudidentity.groups.lookup failed with error:
Error(2028): Permission denied for resource my-group@googlegroups.com (or it may not exist).
This is because Cloud Identity Groups API targets "organizational groups" managed under Google Workspace or Cloud Identity. Groups created with regular Google accounts on googlegroups.com are outside organizational identity management and cannot be operated on with this API.
Make sure your target groups are created under your organization’s domain (e.g., @example.com), not @googlegroups.com. Groups created from the Google Workspace admin console (admin.google.com) or from groups.google.com with the domain specified will be treated as organizational domain groups.
Conclusion
In this article, I introduced a system that dynamically manages Google Groups members based on spreadsheet data using the Cloud Identity Groups API.
- Basic usage of Cloud Identity Groups API (lookup, listMembers, create, remove)
- Sync logic design using declarative reconciliation pattern
- Implementation of exclusive control
This approach is particularly effective for managing time-limited project teams or groups with regularly changing members. Simply editing the spreadsheet automatically updates group members, significantly reducing management overhead.
References
- Cloud Identity Groups API
- Migrating from Groups Service to Cloud Identity Groups Advanced Service
- Google Apps Script – LockService
- Kubernetes – Controller Pattern
- Cloud IdentityでGoogleグループからメンバーを追加・削除するGoogle Apps Scriptを書いた
- Cloud Identity APIでGoogle Workspaceのグループ(Google Groups)を操作する
- Google Apps Scriptでグループアドレスの作成・削除を行う【GAS】